Dorie’s Cookies Parmesan Galettes: Ooh La La

dorie-cheese-crackers-2

Here’s something delightfully intriguing: the Dorie’s Cookies cookbook has a chapter devoted to savoury cookies. I’m not used to seeing non-sweet things in my baking cookbooks, but there are plenty of interesting (and weird: I’m looking at you, hot-and-spicy togarashi meringues and honey-BLUE CHEESE madeleines) recipes here.

(I am never going to make those madeleines. I hate blue cheese.)

dorie-cheese-crackers-9

A little while ago, I was supposed to head to a friend’s house for a pre-dinner birthday gathering. I thought the Parmesan Galettes sounded perfect for an appetizer, so I decided to try my hand at my first savoury cookie.

(I ended up having to turn the car around and skip the party because the roads were horrible – so I had these all to myself.) (Note: I wrote this post back in February when snow was still a thing…)

dorie-cheese-crackers-10

The ingredient list is short and sweet: all-purpose flour, butter, Parmesan cheese, and a bit of sea salt. If you’re reading this, I probably don’t have to tell you to buy the kind of Parm that you have to grate yourself. But just in case… there you go.

dorie-cheese-crackers-12

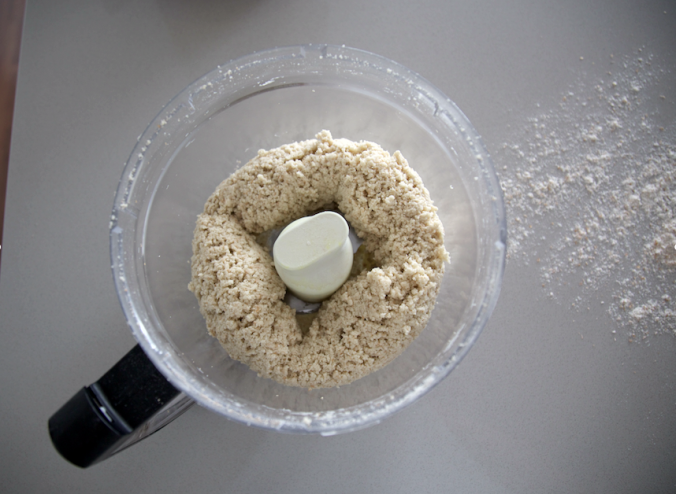
This recipe doesn’t require a mixer; it uses the food processor to mix the butter, flour, and Parmesan. Here’s how the dough is described: “process in long bursts until you have a moist curds-and-clumps dough”. Although that sounds incredibly vague and non-scientific, somehow, I knew exactly what Dorie meant when the time came.

dorie-cheese-crackers-4

I’m pretty sure this is what moist curds and clumps looks like?!

It’s super easy to smush the dough into a log. I was surprised at how teeny tiny the log was, but the recipe yielded 15 galettes, as the book said it would. Before slicing, you pop the log into the fridge for a couple of hours (or the freezer for just one hour, if you’re of the opinion that time is money).

dorie-cheese-crackers-5

After the dough has chilled, it’s time to slice and dice. The sidebar of the recipe says that these galettes pair nicely with a variety of herbs and spices, so I experimented (conservatively) by grinding a bit of fancy pepper over each galette. (If you’re wondering what fancy pepper is, it comes from France and includes tasting notes – thanks Mom and Dad!!!)

dorie-cheese-crackers-6

dorie-cheese-crackers-7

Note: If you look closely, you can see that some of my galettes have a tiny hole in the middle. This is because I didn’t roll my log quite tightly enough. Lessons learned!

The cookbook says that you can either bake the sliced galettes in a muffin tin (for a perfect circular shape and satisfying edges) or free-standing on a cookie sheet.

dorie-cheese-crackers-8

I baked 12 in the muffin tin and the rest on a baking sheet, and while the muffin ones looked prettier, I found they took a little longer to bake than the designated 15 to 17 minutes. They were more like 20 minutes.

dorie-cheese-crackers-3

Here’s the verdict on the galettes:

I LOVED them. They reminded me of dinner parties when I was younger. I feel like my mom used to serve cheese straws or something that were just like this. I loved the slightly crumbly texture and I thought they tasted just the right amount of Parmesan. I like Parmesan, but usually as a side cheese, not as a cheese on its own. Like, I wouldn’t typically eat Parmesan alone on crackers. These galettes were fantastic and felt fancy to me.

dorie-cheese-crackers-1

Cedric did not like them. I did not see this coming from a mile away – in our relationship, I am the one who favours sweets and he likes all things savoury (though he’s never met a chocolate chip cookie he didn’t like). Not only that, but he LOVES cheese – including Parmesan. He will gladly slice Parmesan and put it on a panini (which is exactly what he did with the leftover Parmesan from this recipe). But for whatever reason, this recipe didn’t do it for him.

Oh well. More for me!

Bread Illustrated’s Skillet Pizza

It’s been nearly a year since I first cracked open the pages of the Bread Illustrated cookbook. In that time, I’ve made a few different pizza variations. There was the fluffy, cloud-like thick-crust Sicilian-style pizza. There was a thin-crust flatbread style pizza. There were the calzones, which I ended up baking a second time with a proscuttio/cheese mix that was delicious.

skillet-pizza-1

My most recent pizza attempt was for a recipe that seemed to be too easy to be true: skillet pizza. This recipe is in the first chapter of the book, “Starting from scratch” – a.k.a., foolproof recipes that just about anyone can do. As such, I had somewhat low expectations. I didn’t expect it would measure up to the other (very delicious) recipes I’d tried. As it turns out, I was pleasantly surprised.

skillet-pizza-7

The skillet pizza dough is simple to make and doesn’t take much time. There’s no stand mixer required – instead, you pulse together bread flour, yeast, salt, olive oil, and some ice water in a food processor to form the dough. I used a whole wheat bread flour, which made for a delicious crust.

skillet-pizza-5

The dough is then kneaded together by hand, then left to rise for a couple of hours. The recipe includes an easy tomato sauce recipe (which I bungled by forgetting to drain the liquid from the canned whole tomatoes – it was salvageable, luckily) and recommends simple toppings: some fresh mozzarella and fresh basil. You could probably add a little more, but this isn’t a super hearty crust and the bake time is pretty quick, so I think going heavy handed on the toppings could easily result in a sad, soggy pizza. I erred on the conservative side and stuck to the recommended toppings, and it was quite tasty.

skillet-pizza-4

Cedric was eating a chocolate chip banana muffin and wanted it in the shot…

The uniqueness of this recipe is how the dough is baked. The recipe yields two smallish (11 inch) pizzas. You roll out each piece – the dough rolls very easily, by the way – and put it in an olive oil-coated skillet. You cook it on high on the stove top for 3 minutes (make sure the sauce doesn’t dribble out, or it could get a little burny), then pop it in a hot, 500 degree oven for 7 to 10 minutes.

skillet-pizza-

My timing was a little off for the first pizza, and the oven wasn’t entirely done preheating when I popped the pizza in, so I finished it off with a couple of minutes under the broiler before serving it.

Tip: Don’t forget that the handle of the skillet will be BURNING HOT. I very nearly forgot – that would have been disastrous.

skillet-pizza-2

We drizzled our pizzas with some Nona Pia’s balsamic reduction (straight outta Whistler) and dug in for an unexpectedly delicious – and very easy – pizza dinner. The pizzas were sort of personal-pan sized. I ate about three quarters of one, while Cedric ate one and the rest of mine.

Bread Illustrated keeps on surprising me – just when I think I’ve baked all the best looking recipes, an unexpected hit emerges. Three cheers for skillet pizza!


I am a participant in the Amazon Services LLC Associates Program, an affiliate advertising program designed to provide a means for us to earn fees by linking to Amazon.com and affiliated sites.

Cheddar and Black Pepper Bread: A Mouthwatering Savoury Match Made in Carbohydrate Heaven

The Bread Illustrated cookbook has done it again: another home run of a bread recipe.

Screen Shot 2017-07-25 at 7.53.11 PM

When I first sank my teeth into a still-warm slice of this loaf, I knew that the combined flavours reminded me of something I’d had before – but I couldn’t quite put my finger on it.

A few slices later, I figured it out: fancy macaroni and cheese. Not the kind that comes from a blue box (though that kind, too, can be delicious in the right context) – the kind that you order at a restaurant that also has bison burger and truffle curly fries on the menu. Classy mac n cheese.

Screen Shot 2017-07-25 at 7.53.40 PM

I’m not sure how we ended up cutting this loaf so strangely…

Had I known the cheddar and black pepper bread would be so astonishingly delicious, I would have made it a lot sooner. I held off because it seemed less all-purpose than many of the other loaves; for instance, it probably wouldn’t taste very good toasted and topped with jam for breakfast.

(On second thought, that actually sounds amazing.)

I made it to accompany a salad we had for dinner, and Cedric has already requested that we add it to the rotation. It requires making a sponge the day before, which can sit out between 6 and 24 hours. I let it sit for nearly an entire 24 hours, which I like to think helped it taste extra delicious.

The day two directions aren’t necessarily tricky. They’re just a little time consuming. Mix for two minutes; rest for 20. Mix for 5, rise for 30. Fold dough; rest for 30 minutes; repeat three more times, then let it rise for another hour and a half, then an hour more. Whew – that’s a lot of waiting around.

Screen Shot 2017-07-25 at 7.53.46 PM

There are two secret ingredients to this bread – actually, given that they’re in the name of the bread, they’re not all that secret. The first is cheddar: one cup is mixed into the dough towards the beginning of the process, and another is rolled in later, kind of like a cinnamon raisin bread. Cracked pepper is added both in the dough and as a final topping before baking. I didn’t measure out my pepper – I just cracked away until it looked about right. I was pretty happy with the flavour.

cheddar-pepper-6

I used approximately this much pepper

I was careful with all the resting and rising times because it was quite warm the day I baked it. It didn’t take as long for the dough to rise and double and all that good stuff, so I stuck to the low end of any suggested ranges. You guys – I think I’m finally getting it!

It felt really good for the bread to come out looking as it should and tasting better than I could have imagined. I was planning on using Cedric’s camera to take some photos of the final product, but we couldn’t wait to dive in. Whoops. My phone photos will have to suffice.

cheddar-pepper-2

Savoury breads, I’m not longer afraid of you.

cheddar-pepper-3


PS – I’ve made this bread once more since – both times, it hasn’t lasted more than 24 hours. This is a bread for the books.

Getting Into the Calzone Zone

Calzone-10

I’m still dreaming about the Sicilian-style thick-crust pizza I made a little while back from “The Perfect Crust” chapter in my Bread Illustrated cookbook. I’ve been eager to have a go at another recipe from this chapter ever since I bit into the pillowy, cloudlike dough.

The spinach-ricotta calzone recipe seemed like the natural next step – after all, it’s the recipe that immediately follows the thick-crust pizza in the book. We had a couple of friends over for dinner the other night who were willing to be my calzone guinea pigs (I’ve never made calzones before). Game on!

This recipe had me scratching my head a little right off the bat. It clearly says it serves four, but the recipe only makes two calzones. Aren’t calzones like a personal pan pizza? Who wants to be served a half a calzone? I decided to err on the safe side and double the recipe.

Calzone-1

Pulsing up some dough

The calzone dough can be made the day-of. The longest step in this recipe is actually waiting for the frozen spinach to thaw. I underestimated how long that would take and ended up running the packets under warm water to speed up the process.

Calzone-2

Mixed, risen, and ready to roll – literally

I doubled both the dough – which consists of bread flour, yeast, salt, olive oil, and water – and the cheesy, cheesy filling. It’s a three cheese affair, with ricotta, mozzarella, and Parmesan added to spinach, egg yolks, garlic, oregano, olive oil, red pepper flakes, and a bit of salt. Neither components of this recipe were especially hard to whip up, but the assembly was a little more difficult.

Calzone-3

I rolled my doubled dough recipe into four 9-inch rounds. Then, I loaded them up with the filling, which I spooned on generously, though still had quite a bit leftover. I added prosciutto to three of the four ‘zones, leaving the fourth meat-free for our vegetarian friend.

Calzone-5

Next step: fold the dough over. Easy, right? Not so fast – it appeared I’d been quite heavy handed in doling out the cheesy goodness. I unfolded, scooped a bit out of each one, and made a second attempt at folding. It was still a rather tight fit, but it was better than the first attempt.

Calzone-7

This step – even with the accompanying photo in the book – had me scratching my head a little: “Starting at 1 end of calzone, place your index finger diagonally across edge and pull bottom layer of dough over tip of your finger and press to seal.” I couldn’t figure out what that meant (or why they used “1” instead of “one”), so I just did my best to seal and crimp.

Calzone-8

My seal was not perfect. Luckily, this wasn’t a fruit pie, where the tiniest gap results in a volcanic explosion of fruit juice. The filling stayed put, despite my holes.

Calzone-9

I probably could have cooked the calzones a little longer, but I erred on the conservative side because I had made them a couple of hours in advance and knew they’d spend a bit of time in the oven to rewarm again later. I think they would have looked a little nicer with a bit more colour, though.

I’m not going to lie – the calzones were massive. One person managed to finish theirs entirely, while the other three made it about 1/2 to 3/4 of the way. I wonder if it would be possible to not double the recipe, but just make three or four smaller dough circles, rather than the two the recipe calls for. If you opt to double the dough, you don’t need to double the recipe – maybe 1.5x it instead.

Calzone-11

From a taste standpoint, the dish was delicious. The flavours were fantastic. My friend made a lovely salad to go with it, and we were all left stuffed and happy.

Just another success story from the Bread Illustrated cookbook, folks!

Pita Bread! Bread Sticks! And a Very Bready Sneak Peek…

Let’s talk bread.

I can’t remember if I already posted this, but I finally bit the bullet and ordered my very own copy of Bread Illustrated by America’s Test Kitchen. I had an Amazon credit and I couldn’t think of a better way to spend it. I’m sure the Squamish Public Library will be happy to see its copy returned (I think I’ve had it for like, 8 weeks).

This week, I have two breads to discuss… and a third AWESOME bread, with its very own post, will follow soon.

Bread #1: Pita

Of all the breads I have made thus far, the most exciting has been the pita. It is a simple recipe (consisting only of bread flour, yeast, salt, water, olive oil, and a little sugar) and it doesn’t take much time to make (between 2 and 3 hours – which isn’t a lot compared to many of the other breads I’ve made). I guess pita just always seemed to me like something you have to buy, so making it felt really exciting. (I acknowledge that this may not be as exciting to other people as it is to me.)

pita-1

I halved the recipe, which originally yielded 8 pitas. Two of my pitas came out PERFECTLY, while the other two were a little overdone. Here’s why: when it comes to actually baking the pita, the instructions are as follows: “… bake until single air pocket is just beginning to form, about 1 minute [then you flip them and bake the other side]”. When I baked my pitas, a few small air bubbles would form at various points. Eventually, they would puff up and creep forward until they joined, forming one large bubble. (Side note: this was SO COOL to watch). With two of the pitas, I flipped them around the 1 minute mark, where only small bubbles had formed. For the other two, I flipped them when the one large bubble had formed, which actually happened closer to the 2 minute mark. The confusion stemmed from the fact that the two cues – the 1 minute timing and the single large bubble – did not occur simultaneously. The two that turned out best were the ones I flipped at the 1 minute mark. Waiting until the large bubble formed resulted in overdone pitas.

pita-2

I served our pitas with a Buddha bowl type of dinner. DELICIOUS.

pita-3

I made Cedric puff open the pita to really feature its pocketiness.

Bread #2: Parmesan Breadsticks

Next bread: parmesan breadsticks. There was nothing wrong with these, but they weren’t quite as good as restaurant breadsticks. The recipe called for 1.5 cups of parmesan, which is plenty, but I still would have liked an even cheesier flavour.

They were DEFINITELY better than grocery store breadsticks, however. The grocery store ones taste like they were made with Kraft singles – yuck.

(the left photo is the before baking picture)

My fatal flaw with the breadsticks was that I tried to keep them warm until the rest of the dinner was ready, but I think they kept cooking a bit so they were ever so slightly dry. They were still delicious. I halved this recipe, too (which originally makes 18 breadsticks).

Now, the bread that has really taken centre stage in my bread making life is a certain bread that took THREE WEEKS to materialize. Stay tuned for a Very Special Post about my new pride and joy … SOURDOUGH BREAD!